Shortbread cookies, rich flavour with only few ingredients

Published on HT, 27 February 2014

A Scottish tradition that has come a long way in history.  

Shortbread cookies can be made with different extra ingredients to give any desired flavour without altering their crumbly texture.  Photo credit: Valerie Brun - Helsinki Times

Shortbread cookies can be made with different extra ingredients to give any desired flavour without altering their crumbly texture.
Photo credit: Valerie Brun – Helsinki Times

Originally called “biscuit bread”, the history of shortbread goes back to at least the 12th century. Back then, biscuits that were made from leftover bread dough, was sometimes sweetened and dried out in the oven to form a hard and dry rusk. This was practised all around Britain, not only in Scotland.

Later on, the leavening was replaced with butter, which made it an expensive and fancy treat that was only enjoyed during Christmas season and the Scottish New Year Hogsmanay. It is said that Mary Queen of Scots was particularly fond of them.

The large amount of butter is what makes a shortbread so crumbly. This is the reason why the fat added to biscuits and pastries is called “shortening”. Today’s shortbread is made from flour, butter and sugar. Only three ingredients from which many pastries can be made, each with different variations and added ingredients, including almonds and citrus fruits, to give them extra flavour.

Shortbread usually comes in three different forms: small round biscuits, fingers or large rounds. At one time, though, the dough was baked in a round mould and then cut into wedges that were given the name “petticoat tails”, referring to the shape of the shortbread wedges which was similar to the bell-hoop petticoats worn by court ladies back in the 12th century

The secret to making a good shortbread is to use good quality butter and pure vanilla extract. Butter is the main ingredient that brings all the flavour, colour, texture, aroma and body to the cookie.

Choosing a good vanilla extract is important as well. In Finland, vanilla extract is not so easy to find. But one can find them at Stockmann’s grocery store or online. Stay away from vanilla sugar for this recipe, as it is made with synthetic vanilla, and the flavour will not be as satisfying as pure vanilla extract.

Shortbread dough is so versatile: once it’s made, you can add 90 g of chocolate chips or a teaspoon of instant espresso powder, cinnamon, lemon or orange zest, etc. You can give it the flavour you want without altering the crumbly texture and quality of the cookie. For these particular shortbread cookies, I added a splash of coffee liquor to give it a rather stronger coffee flavour that harmonises perfectly with the chocolate glaze on top.

So here is the basic recipe for these shortbread cookies. Use your imagination and add the extra flavour you want to eat and enjoy!

Bon appétit or better said in good Scottish Gaelic: Ith gu leòir!! (“eat plenty”, literally translated).


Photo credit: Valerie Brun - Helsinki Times

Photo credit: Valerie Brun – Helsinki Times

Recipe

• 260 g all-purpose flour
• ¼ tsp. salt (ignore if using salted butter)
• 226 g unsalted butter at room temperature
• 60 g confectioner’s sugar
• 1 tsp vanilla extract

For chocolate dipped shortbreads:

• 180 g semi-sweet or bittersweet chocolate, finely chopped.

Instructions:

• In a separate bowl, whisk the flour with the salt. Set aside.

•In the bowl of your electric mixer, beat the butter until smooth and creamy (about 1 minute). Add the sugar and beat until smooth (about 2 minutes). Beat in the vanilla extract. Gently stir in the flour mixture just until incorporated. Flatten the dough into a disk shape, wrap it in plastic and chill the dough for at least an hour or until firm.

• Preheat oven to 177°C with the rack in the middle of the oven. Line up two baking sheets with parchment paper.

• On a lightly floured surface, roll out the dough into a 0.6 cm thick circle. Cut into rounds or other shapes using a lightly floured cookie cutter. Place them on the prepared baking sheets and keep them in the refrigerator for about 15 minutes before baking. This will firm up the dough so that the cookies will maintain their shape when baked.

• Bake for 8-10 minutes or until the cookies are very lightly browed. Cool on a wire rack.

For chocolate dipped shortbreads:

• Place 90 g of the finely chopped chocolate in a heatproof bowl and place it over a saucepan of simmering water. Once the chocolate has melted, remove it from the heat. Add the remaining chocolate and stir with a wooden spoon until it has completely melted and is smooth and glossy.

• Pour the chocolate onto the cookies from left to right and/or up and down, decorating the cookies with chocolaty patterns.

• If you wish, you can also dip one end of each cookie in the melted chocolate and place it on a parchment lined baking sheet.

• Place the cookies in the fridge for about 10 minutes or until the chocolate has hardened.

• Shortbread cookies will keep in an airtight container for about a week or they can be frozen. Makes about 20 middle-sized shortbread cookies.


Taking a breath of French air in Munkkiniemi

Published on HT, 16 January 16 2014

A Cantine where everybody knows the boss.

The vibe of an everyday lunch bistro disappears, and the restaurant transforms into a fine dining candlelit restaurant. Photo credit: Valerie Brun / Helsinki Times

The vibe of an everyday lunch bistro disappears, and the restaurant transforms into a fine dining candlelit restaurant.
Photo credit: Valerie Brun / Helsinki Times

THINKING back to my childhood, I can still hear the bell ring at twelve sharp when it was time to run down to the canteen for lunch with our schoolmates. Today, the bell is the sound of our growling bellies telling us it’s lunch hour with our colleagues.

Some things never change, and in keeping with this concept is Franck Doreau, the French owner and Head Chef of La Cantine: a neighbourhood bistro packed with people each day between 12:00-14:00, offering its busy customers a warm lunch menu before they go on with their busy schedule.

Meatballs bathed in mushroom sauce, tuna steak à la Provençale, risotto with mussels and saffron – such are the high-quality dishes La Cantine offers its customers for lunch on a daily basis.

The vibe of an everyday lunch bistro disappears, and the restaurant transforms into a fine dining candlelit restaurant. Photo credit: Valerie BRUN / Helsinki Times

The vibe of an everyday lunch bistro disappears, and the restaurant transforms into a fine dining candlelit restaurant.
Photo credit: Valerie BRUN / Helsinki Times

A successful reputation has preceded this 24-seatting bistro, and, upon request of its own clientele, La Cantine has expanded to an evening service offering a new à la Carte menu.

I cannot think of a better time to come in and taste this new traditional French Carte, so I step inside and immediately choose my table while Benjamin Taylor, a very kind Australian waiter and sous-chef, lights up a few candles adding atmosphere to this small dining area. Dark wooden tables and a few black and white photos of Paris give a vintage touch.

I’ve had lunch here several times before, and I have noted how the ambiance changes completely during the evening service. The vibe of an everyday lunch bistro disappears, and the restaurant transforms into a fine dining candlelit restaurant.

À table!

Assiette du jardinier, or Garden platter (€9), composed of three toasted breads served with eggplant mousse, homemade tapenade (olive and capris mousse) and half-dried tomatoes. Photo credit: Valerie BRUN / Helsinki Times

Assiette du jardinier, or Garden platter (€9), composed of three toasted breads served with eggplant mousse, homemade tapenade (olive and capris mousse) and half-dried tomatoes.
Photo credit: Valerie BRUN / Helsinki Times

My first taste was composed of Moules à la Provençale (€9), a green mussel baked with garlic-parsley butter, sitting on a bed of coarse sea salt. As a second starter, a vegetarian Assiette du jardinier, or Garden platter (€9), composed of three toasted breads served with eggplant mousse, homemade tapenade (olive and capris mousse) and half-dried tomatoes.

Bouillabaisse: Traditional fish soup from Marseille made with white fish, spices of the south and a Rouille sauce made with olive oil and bread.  Photo credit: Valerie BRUN / Helsinki Times

Bouillabaisse: Traditional fish soup from Marseille made with white fish, spices of the south and a Rouille sauce made with olive oil and bread.
Photo credit: Valerie BRUN / Helsinki Times

My favourite starter, however, was the Bouillabaisse (€18.50). This traditional fish soup of Marseille took me back to the Mediterranean land; made with different kinds of white fish and shrimp, it’s served with saffron potatoes and homemade Rouille sauce.

A mild and fruity Chateau la Coste rosé is my wine of choice.

While waiting for my main course, I notice the handwritten menu in white chalk on a blackboard: a very French touch that reminded me of romantic outings at cosy restaurants back in Cannes.

First, a Moroccan lamb stew (€19) baked in the oven with dried apricot and roots; this dish is served with Pita bread from Fafa’s. Photo credit: Valerie BRUN / Helsinki Times

First, a Moroccan lamb stew (€19) baked in the oven with dried apricot and roots; this dish is served with Pita bread from Fafa’s.
Photo credit: Valerie BRUN / Helsinki Times

The main course thrills me beyond expectations. First, a Moroccan lamb stew (€19) baked in the oven with dried apricot and roots; this dish is served with Pita bread from Fafa’s. I never thought I would enjoy dried fruit in a savoury dish, but I am surprised to enjoy the extra flavour that this innovation brings to the palate.

Last but not least, a tender beef flank steak (€24) with shallot and red wine sauce makes an entrance on a wooden platter, served with green beans rolled in bacon and a traditional gratin dauphinois. I am delighted with its presentation and enchanted by its traditional and genuine flavours.

Traditional french Crème Brûlée with a touch of orange and lemon.  Photo credit: Valerie BRUN / Helsinki Times

Traditional french Crème Brûlée with a touch of orange and lemon.
Photo credit: Valerie BRUN / Helsinki Times

Despite the fact I have had to kiss my diet goodbye, I am fully satisfied and do not regret one bite of this exquisite banquet. “Do you still have room for dessert?” Taylor asks as he clears my table. My eyes open wide as I answer with a smile, especially since I had previously noticed a delectable crème brulée (€7.50) in the display window when I came in.

While waiting for my well-deserved sweet treat, Doreau joins me to tell me more about his successful business.

Previously named Le Bistro, this restaurant used to be a café owned by Christophe, from Martinique. Doreau started working with him and together they slowly developed a lunch hour service. Two years ago, Christophe left the business and went back to his home country leaving our marseillais chef as the sole worker, and today, the owner of the place.

La Cantine Restaurant serves traditional French cuisine for both lunch and dinner and offers high quality dishes to the quiet neighbourhood of Munkkiniemi.  Photo credit: Valerie Brun / Helsinki Times

La Cantine Restaurant

La Cantine
Laajalahdentie 17
00330 Helsinki
Tel. 09 499 901
http://www.lacantine.fi
lacantinehelsinki@gmail.com

Passion stronger than numbers

Doreau arrived in Finland nine years ago and fell in love with Finnish summers. He’s stayed in this country ever since.

Dark wooden tables and a few black and white photos of Paris give a vintage touch. Photo credit: Valerie BRUN / Helsinki Times

Dark wooden tables and a few black and white photos of Paris give a vintage touch.
Photo credit: Valerie BRUN / Helsinki Times

Initially an accountant and working in his family business, he soon realised numbers were not his passion in life. The kitchen had seduced him since he was a child, and following his passion for the culinary world, Doreau decided to leave the family business. Today, as owner of a successful restaurant, his parents are proud and happy for their son’s accomplishments.

Offering a different recipe every day for lunch, this head chef keeps a repertoire of up to 400 recipes up his sleeve since he’s worked at this bistro. “I cook what I know best,” he says humbly. “It’s exactly the same cuisine I would cook with my nana.”

Photo credit: Valerie BRUN / Helsinki Times

Photo credit: Valerie BRUN / Helsinki Times

Since there’s a dearth of Mediterranean fish in the Baltic Sea, Chef Doreau adapts his recipes to the fish he can find here but stays true to the southern taste. Furthermore, La Cantine has French suppliers that bring him goods from Paris, such as rabbit and poultry, and wine from the south of France.

Desserts are all homemade. Aside from the crème brulée, a myriad of choices of classic pastries are also available, such as Tarte Tatin, the classic apple pie; half-baked chocolate brownie with vanilla ice cream; and very soon, succulent éclairs: pate à choux filled with chocolate or coffee cream.

Secret to success

Franck DOREAU, Head Chef from Marseille and owner of La Cantine, located in the quite neighbourhood of Munkkiniemi.  Photo credit: valerie BRUN / Helsinki Times

Franck DOREAU, Head Chef from Marseille and owner of La Cantine, located in the quite neighbourhood of Munkkiniemi.
Photo credit: valerie BRUN / Helsinki Times

Independent restaurants are rare to survive in the tough culinary business, but La Cantine does it well.

“It’s a job where you never fold your arms. It’s always hard work,” Doreau says, adding, “Don’t be afraid to come early in the morning and leave late at night. Trust in your team is also important.”

A long-term dream is to open a second La Cantine restaurant keeping the same concept. “It’s not a project in process just yet,” he admits, “but I would love for it to happen one day.”

Benjamin TAYLOR, waiter and today's sous-chef at La Cantine.  Photo credit: Valerie BRUN / Helsinki Times

Benjamin TAYLOR, Australian waiter and today’s sous-chef at La Cantine.
Photo credit: Valerie BRUN / Helsinki Times

Today, Doreau works on building a familiar and easy-going neighbourhood bistro where customers know the boss well. Although not a very common concept in Finland, this is what our French Head Chef wishes for his place, which he may have already achieved, and quite successfully, too.

VALÉRIE BRUN
HELSINKI TIMES

Molasses Cookies to keep you cosy

Published on HT, 24 October 2013

Enjoying a perfect seasonal sweet treat for the holidays


Chewy molasses cookies with cinnamon, ginger and spices of the season

Chewy molasses cookies with cinnamon, ginger and spices of the season 

WINTERTIME is upon us – it’s time to enjoy the cool air and make the best out of our long dark days. What could be better than coming home after a long day of work and cuddling up on the couch with a nice hot cup of tea and something for your sweet tooth? That is when these cookies come in with their cinnamon and ginger flavour.

Up until the 1880s, molasses was the most popular sweetener in America because it was so much cheaper than refined sugar. After WWI, however, refined sugar prices dropped drastically, resulting in the migration of consumers from molasses to white sugar crystals.

Today, molasses is widely recognised for its natural goodness and broad range of vitamins and minerals. Molasses is used extensively for cooking and marinades, in health products, brown sugar, industrial alcohol and rum products as well as to make yeast and confectionery.

Molasses is the key ingredient in these cookies. It can be easily found in any grocery store as tumma siirappi, coming from pure unprocessed sugar cane juice that has been clarified and reduced with no sugar extracted. It has a robust taste and brings out the best result in texture and scent for these seasonal treats.

These cookies are very easy to make, so get to it and enjoy!

Molasses Cookies

Molasses cookies, easy-to-make perfect holiday treat.

Molasses cookies, easy-to-make perfect holiday treat.

Ingredients

260 g all purpose flour

1 tsp baking soda

¼ tsp salt

1 tsp ground cinnamon

1 tsp ground ginger

½ tsp ground cloves

113 g unsalted butter at room temperature

210 g dark brown sugar

2 tbsp vegetable, canola or safflower oil

80 ml un-sulphured molasses

1 large egg

½ tsp pure vanilla extract

To garnish

170 g granulated white sugar

Let’s do it!

In a large bowl, sift together the flour, baking soda, salt and spices.

In the bowl of your electric mixer (or with a hand mixer), beat the butter and sugar for about 2 – 3 minutes until light and fluffy. Add the oil, molasses, egg and vanilla extract and beat until incorporated. Beat in the flour mixture until well combined. Cover and chill until firm (about 2 hours or overnight).

When the dough has chilled sufficiently, preheat oven to 190°C and line two baking sheets with parchment paper.

Place about 170 g of white granulated sugar in a medium-sized bowl. Roll into 2.5 cm balls of dough (about 22 – 24 g) and roll them into the sugar, coating them thoroughly. Place them on the baking sheet, spacing about 5 cm apart and, with the bottom of a glass, flatten the cookies slightly.

Bake for about 9-10 minutes or until the tops of the cookies have crinkles yet are barely dry. They will look a little underdone but that is the secret to have chewy cookies even after they have cooled down.

Remove from oven and cool on a wire rack. Store in an airtight container for up to a week.

Makes about 32 cookies.

Price: 25,00 € (if you wish to order from me)

Text and Photos: Valerie Brun. 

The other perfect Philly cheese

Published on HT, 3 October 2013
Rich, dense and delicious Philadelphia Cheesecake topped with a succulent layer of sour cream and a touch of vanilla.

Rich, dense and delicious Philadelphia Cheesecake topped with a succulent layer of sour cream and a touch of vanilla.

Philadelphia cheesecake offers a perfect autumn dessert. 


Most people think that cheesecake originated in New York, but in fact, the first cheesecake recipe dates back to Greece in 230 AD. When the Romans conquered Greece, they adopted the recipe and added a few variations, and as the Roman Empire expanded, the recipe was brought to the Europeans who began experimenting by putting their own spin on the recipe.

Cream cheese was accidentally discovered in 1872 by a New York dairy farmer while trying to replicate a French cheese, who instead discovered the process that results in the creation of cream cheese; three years later, cream cheese was packaged in foil and distributed to local stores under the Philadelphia Cream Cheese brand, which was then bought by the Kraft Cheese Company in 1928.

Originally called “New York cheesecake”, because it’s made with Philadelphia cream cheese, I prefer to call it “Philadelphia cheesecake”. This recipe is creamy, rich, dense and absolutely addictive and delicious. It has three layers, starting with a Graham cracker crumb crust, topped with a cream cheese filling and on topped with a wonderful rich yet light layer of sweetened sour cream and a touch of lemon.

Tip: Make sure to not overbeat the batter; we want a dense texture so it is best to not let too much air in when mixing; this also prevents cracks on the surface when baked.

Enjoy!

Ingredients

Crust:

200 grams of graham cracker crumbs or finely crushed Digestive biscuits

50 grams granulated white sugar

114 grams unsalted butter, melted

Filling:

907 grams cream cheese, room temperature (use full fat only)

200 grams granulated white sugar

3 tablespoons all purpose flour

5 large eggs, room temperature

80 ml heavy whipping cream

1 tablespoon lemon zest

1 teaspoon pure vanilla extract

Topping:

240 ml full fat sour cream (kerma viili)

2 tablespoons granulated white sugar

½ teaspoon pure vanilla extract

Let’s do it!

Grease a 23 cm spring form pan. Preheat oven to 177°C with oven tray with parchment paper in centre of oven.

For Crust: In a medium sized bowl combine the graham cracker crumbs, sugar, and melted butter. Press the crumbs evenly over the bottom and about 2.5 cm up the sides of the spring form pan. Cover and refrigerate while you make the filling.

For Filling: In a bowl of your electric mixer place the cream cheese, sugar, and flour. Beat on medium speed until smooth (about 2 mins), scraping down the bowl as needed. Add the eggs, one at a time, beating well (about 30 secs) after each addition. Scrape down the sides of the bowl. Add the whipping cream, lemon zest, vanilla extract and beat until incorporated. Remove the crust from the refrigerator and pour in the filling. Place the cheesecake on an oven tray with parchment paper to avoid any leakage and place in the oven.

Bake for 15 minutes and then lower the oven temperature to 120°C and continue to bake for about another 60 – 90 minutes or until firm and only the centre of the cheesecake looks a little wet and wobbly. (The baking time can vary due to the differences in ovens, so make sure to check that the cheesecake is firm with only the centre being a little wet and wobbly.) Remove from oven and place on a wire rack.

Meanwhile, in a small bowl combine the sour cream, sugar, and vanilla extract. Spread the topping over the warm cheesecake and return to oven to bake for 15 more minutes. Remove from oven and carefully run a knife or spatula around the inside edge of pan to loosen the cheesecake (helps prevent the surface from cracking as it cools).

Let cool completely before covering with plastic wrap. Refrigerate several hours, preferably overnight. Serve with fresh fruit or fruit sauces.

Taking the cake

Originating in the 19th century, cheesecake has become one of the favourite desserts in the western world. Living in New York between 1883-1870, German restaurateur Arnold Reuben is generally credited for creating the New York-style cheesecake. From then on, different cities and countries added their own signature ingredients to make their very own cheesecake recipe. Some of the most popular cheesy concoctions include the following:

New York – The classic New York-style cheesecake is served alone; no fruit, chocolate or coulis is served on top of it. In Chicago, they added a layer of sour cream to make it creamier.

Cranberry – This seasonal cheesecake is made with a delicious cranberry filling that is added in the middle and top of your cheesecake instead of the added layer of sour cream.

Italian – Italians use ricotta cheese instead of cream cheese, which gives it a lighter and fluffy texture and an intense and wonderful flavour.

Chocolate – Containing three layers of chocolate. First a sandy textured chocolate crust; the middle layer is a winning combination of chocolate, cream cheese and sour cream and is sinfully topped with a chocolate ganache.

Amaretto – This creamy, rich cheesecake is infused with the luscious taste of Amaretto and is topped with fresh almond pieces, creating a delicious dessert.

And so many more…

Serves : ≈ 12 slices

(Price: 50,00 € – if you wish to order this cake from me).

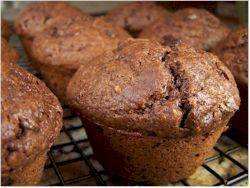
Choco-ricotta muffins

Photo credit - Joyofbaking.com

Choc-Ricotta Muffins / Photo credit Joyofbaking.com

These delicious Chocolate muffins use ricotta in its batter, which is a sweet, moist and grainy soft textured cheese that gives these Choco-Ricotta muffins a cheesecake-like taste and texture. They also provide a double dose of chocolate: one from cocoa powder and the other from the chocolate chunks.

Ricotta (pronounced “rih-KAHT-tuh”) means “recooked”, and is a rich Italian cheese made from the whey (watery residue from making other cheeses, like mozzarella) that is cooked to produce a mild, nutty flavored white cheese. It is very similar to cottage cheese only it is very perishable.

Enjoy!!

Serves : 16 muffins (if you wish to order: 30,00 €)

Ingredients

1 cup ricotta cheese

2 large eggs

320 ml milk

1 tablespoon pure vanilla extract

4 tablespoons unsalted butter, melted and cooled

260 grams all-purpose flour

250 grams granulated white sugar

2 teaspoons baking powder

1/2 teaspoon salt

60 grams Dutch processed cocoa powder, sifted

170 grams semisweet chocolate chips / chunks

Let’s do it!

Preheat oven to 177 degrees C. Place rack in the middle of the oven. Line 16 muffin pans with paper liners or spray with a non stick vegetable spray.

In a medium sized bowl, whisk the ricotta cheese and then add the eggs, one at a time, beating well after each addition. Add the milk, vanilla extract, and cooled and melted butter, mixing well. Set aside.

In a large mixing bowl, whisk together the flour, sugar, baking powder, salt, and cocoa powder.Add the ricotta mixture to the flour mixture. Stir just until combined and then fold in the chocolate chips. Do not over mix this batter or the muffins will be tough when baked.  

Divide the batter amongst the 16 muffin cups using two spoons or an ice cream scoop.

Place in the oven and bake about 20 minutesor until lightly browned and a toothpick inserted in the center of a muffin comes out clean. Remove from oven and place on a wire rack to cool.

Recipe adopted from Joyofbaking.com

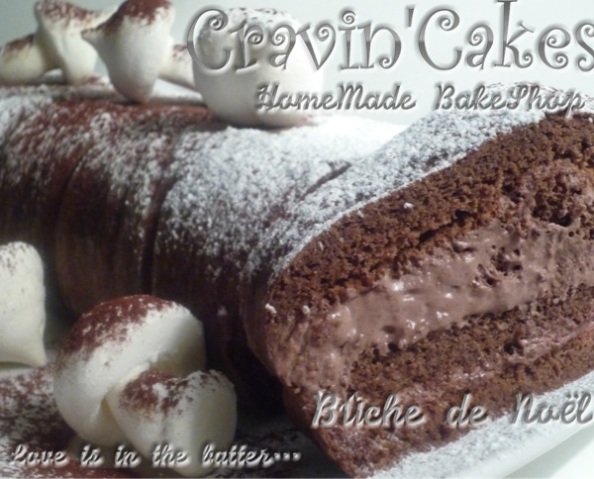
Bûche de Noël – or Yule Log

Bûche de Noël

A little history first…

It is said that it was a tradition, dating from pre-Christian times, to honour the God Thor and to celebrate the winter solstice with a building of a bonfire. The story goes that as Christmas came to replace the Winter Solstice celebrations, France carried on the tradition for a “Yule” log by cutting down a tree each year and then replacing it in the fireplace so that the heat from the log could be used to prepare the Christmas Eve midnight supper. The ashes from the “yule” log were believed to hold magical and medicinal powers that would ward off the evil spirits in the coming year. The tradition of substituting a real “yule” log with a dessert “Yule” Log was probably started when homes were built without fireplaces so they could not burn a real “Yule”Log…

The Bûche de Noël is a traditional Christmas Chocolate Sponge cake. It was an innovative French pastry chef (in the late 1800s) who came up with the idea of replacing the real “yule” log with a  cake that was log shaped.

There are many recipes for this Christmas dessert, and this one entails a deliciously light and moist flourless chocolate sponge cake, filled with chocolate whipped cream. To add a little freshness, I added a few raspberries in the whipped cream filling…

As mentioned before, this particular chocolate Sponge Cake is a little different from most because it does not contain any flour. It is a very light and moist cake that melts in your mouth. The chocolate flavour in this cake comes from melted semisweet chocolate (Fazer branded) which goes very nicely with the light textured chocolate whipped cream filling. I also added a few merengue mushrooms (which I made myself) to give it a nice decoration.

If you wish to order this dessert, you should warn me 48 hrs in advance because it needs to be kept in the fridge overnight 🙂

Enjoy!

Profile Picture-Cravin'Cakes


Serves : 15 slices

Price: 27,00 €

Philadelphia Brownies

Creamcheese Brownies Photo credit: Valerie Brun

Creamcheese Brownies
Photo credit: Valerie Brun

Among the many many many types of brownies there are, this one is one of my favourites because of its cream cheese filling which combines with a dense and fudge-like brownie. With one bite, you will notice how the tanginess of the cream cheese beautifully tempers the deep richness of the chocolate brownie. It’s a perfect way to enjoy both a brownie and cheesecake at the same time…

For these squares I use Philadelphia brand for the cream cheese filling and Fazer for the delicious brownie fudge.

In order to have a dense and fudge-like brownie, the secret is not to let too much air into the batter. For this reason, I make the dough by hand in one bowl. It results into a nicely compact brownie, dense and fudge-like texture.

If you wish to order these “Philadelphia” Brownies, please give me a 48 hrs notice since once they come out from the oven they need to be cooled and refrigerated overnight as this gives time for the flavours to soften and mingle.

Enjoy!!


Ingredients:

113 grams unsalted butter, cut into pieces

115 grams unsweetened chocolate, coarsely chopped

250 grams granulated white sugar

1 teaspoon pure vanilla extract

2 large eggs

65 grams all purpose flour

1/4 teaspoon salt

Cream Cheese Layer:

227 grams full fat cream cheese, at room temperature

65 grams granulated white sugar

1/2 teaspoon pure vanilla extract

1 large egg

Let’s do it!

Preheat oven to 325 degrees F (160 degrees C) and place the rack in the center of the oven. Have ready a9 inch (23 cm) square baking pan that has been lined with aluminum foil.

In a heatproof bowl, placed over a saucepan of simmering water, melt the butter and chocolate. Remove from heat and stir or whisk in the sugar and vanilla extract. Add the eggs, one at a time, beating well after each addition. Stir in the flour and salt and stir vigorously until the batter is smooth and glossy (about one minute). Remove 1/2 cup (120 ml) of the brownie batter and set it aside. Spread the remainder of the brownie batter evenly onto the bottom of the prepared pan.

Then, in the bowl of your food processor (or with a hand mixer), process the cream cheese just until smooth. Add the sugar, vanilla, and egg and process just until creamy and smooth (do not over process). Spread the cream cheese filling evenly over the brownie layer. Spoon 16 small dollops (4 rows with 4 dollops of brownie batter in each row) of the reserved brownie batter evenly on top of the cream cheese filling. Run a knife or wooden skewer back and forth through the two batters until you have a marble effect.

Bake in the preheated oven for about30 minutesor until the brownies are set and the cream cheese is just beginning to brown. (A toothpick inserted into the brownie comes out with just a few moist crumbs.) Remove from oven and place on a wire rack to cool completely. Then cover and refrigerate the brownies until they are firm enough to cut into squares (several hours or even overnight). Once chilled, remove the brownies from the pan by lifting with the ends of the foil and transfer to a cutting board. With a sharp knife, cut into 16 squares. It is a good idea to have a damp cloth nearby to wipe your knife between cuts. These brownies can be stored in the refrigerator for several days. Serve cold or at room temperature.

Serves : 16 squares – 5 cm brownies

Recipe adapted from joyofbaking.com

If you wish to order: 28 €

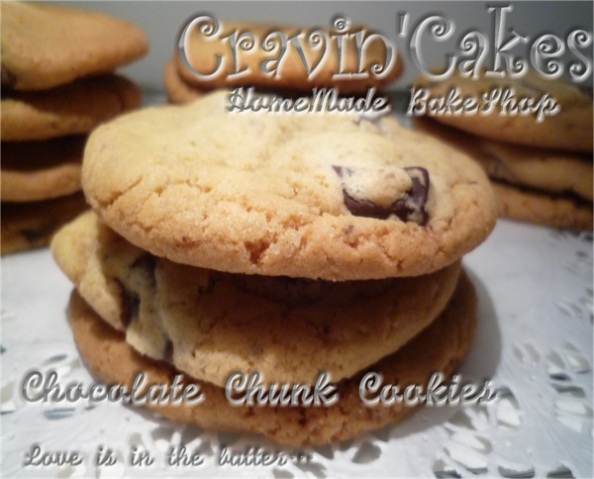
Chocolate Chunk Cookies

chocolate chunk cookies


Chocolate Chip Cookies are considered the number one favourite in the US, they have been made for years and years.

These Chocolate Chunk Cookies have a delicious chewy and full of buttery sweet flavour. They are chewy on the inside while crispy on the edges.

These cookies are usually made with chocolate chips, but since they are so difficult to find in Finland, I decided to use chunks of my favourite Fazer Semisweet chocolate, the outcome is just perfect because it deepens the chocolately flavour in them, a delicious contrast with the buttery taste of the cookie.

These cookies are giant sized, but if you wish to order them and want them smaller, just let me know!

Enjoy!!

Profile Picture-Cravin'Cakes

 Serves : 18 Giant Cookies

 Price : 24,00 €

Lemon CupCakes

Lemon Cakes

These Lemon CupCakes have a wonderful surprise waiting inside : a small pocket of lemon curd (which I make myself). I just LOVE how lemon curd has this ability to be tangy and sweet at the same time… It is absolutely delightful in this yummy CupCakes… They have a burst of lemon playing off the buttery sweetness of the vanilla cupcake and the richness of the lemon flavoured whipped cream frosting (which I also made from the scratch). I can garnish the tops with colour sprinkles, pearl sugar, fresh berries or even candied lemon slice if you ask me to if and when you order these CupCakes 🙂

These CupCakes might look easy to do, but they actually demand a lot of ingredients and preparation time… the outcome is sooooo worth it, though! 😀

Like most cupcakes, they also bear a frosting on top and for this Lemon CupCake , I have simply used a lemon flavoured whipped cream, which I also made myself.
Enjoy!!

Profile Picture-Cravin'Cakes

 Serves : 12 CupCakes
 Price : 25,00  €
  Lemon Curd (if sold separately) : 15,00 € (price including a glass jar)

Chocolate Banana Cake

cravin'cakes-cakes


This cake is in the oven, which means that I have baked it several times with tremendous success but I didn’t have a blog back then so I didn’t think of taking a picture of it… So now, I will replace this picture as soon as I bake it again which will be very soon 😀

When bananas start to ripe, it means that it’s time to bake them. Banana Bread is often perfect in the mornings with some yogurt and some fresh fruit. But when I want to make a delicious weekday dessert, this Chocolate Banana Cake is the one to choose. This cake is just lovely… It combines the sweetness of the ripe mashed bananans with cocoa powder and to make it even more chocolately, the cake is frosted with a smooth and creamy  Chocolate Ganache. This would also be the perfect cake for family gatherings for it feeds up to 16 people 😀 I personally love this cake, even if I am not really a fan of bananas… 😉

So, in a nutshell, Chocolate Banana Cake is a quick bread covered with a delicious Chocolate Ganache (which I make from the scratch: French term referring to a smooth mixture of chopped chocolate and heavy cream). Ganache is often poured over a cake/or torte to give it a smooth mixture or chopped chocolate and heavy cream to give a smooth and shiny glaze, but this time, I whipped it so it becomes a nice thick and spreadable frosting.

Enjoy!!

Profile Picture-Cravin'Cakes

  Serves : 16 people
 Price: 30,00 €